Kubernetes: Basics
What is Kubernetes
Led by Google, the Kubernetes project aims to build a robust platform for running many containers. It allows for the automation of deployments, scaling, and management of containerized applications. Kubernetes enables teams to more effortlessly move workloads across cloud infrastructures by grouping containers into logical units for easy management and discovery.
Why migrate to Kubernetes?
- more efficient use of cloud resources – resulting in cleaner architecture and huge potential savings in cloud costs
- removal of centralized team release responsibilities in lieu of specific functional teams
- decentralized schedule for release cycles across product areas
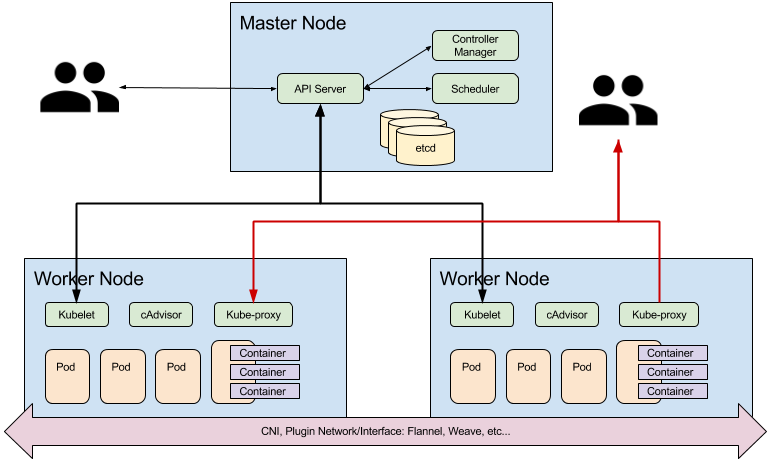
Architecture: Master nodes
A Kubernetes cluster is composed of two types of nodes; master nodes and worker nodes. Master nodes run the control plane, consisting of the following components:
- API server is the external REST interface for the cluster. Clients interact with the cluster via the API, which validates and persists changes within etcd.
- The Scheduler is responsible for the resolution of desired state changes, by deciding where resources/objects should be placed within the cluster.
- The Controller Manager is the core component that manages controller resource implementations within the cluster where users can specify number of replicas or failover minimum criteria across the cluster.
- etcd distributed key-value store
All cluster nodes run kubelets which interact with the Docker APIs in order to execute cluster commands, execute/destroy containers, etc…
Architecture: Worker Nodes, Networking
Each worker node runs kube-proxy, a simple network proxy and load balancer. Kubernetes, kube-proxy integration with Container Networking Interface (CNI) allows for cluster network orchestration. Each Pod gets its own IP address. Pod lifecycle events trigger attachment/removal from the underlying software-defined network. CNI implementations allow the cluster to cross-resolve Pods without resorting to NAT.
There are various implementations of CNI. The most commonly used ones are:
Namespaces
- provide a logical partition of the cluster’s resources
- kubernetes resources are scoped to a namespace
- all resources within a namespace must have unique names
- kubernetes allows for assigned quotas for resource limitations within a namespace
- namespace of default is used if none other is specified
- the kube-system is used for etcd instances, the API servers, controller managers, schedulers, kube proxies, and weave networking CNI pods
API Versioning
Kubernetes provides a clear and consistent API by versioning at the API level rather than at the resource level. The Kubernetes API maturity levels include; stable, beta, alpha.
Kubernetes employs API Groups to aid in frictionless extension of the platform. An
API Group consists of a REST path and API version. The core or legacy API Group
is /api/v1 and newer, named groups are at REST path: /apis/$GROUP_NAME/$VERSION.
Use kubectl api-versions to get a list of all APIs supported by your clusters API Server.
Pods
A pod the smallest deployable unit in Kubernetes. A pod is a logical group of one or more containers that share the same IP address and port space.
Containers within a pod can find each other via localhost, and can also communicate with each other using standard inter-process communication mechanisms.
Pods are not durable.
apiVersion: v1
kind: Pod
metadata:
  name: redis
spec:
  containers:
  - name: redis
    image: redis
Pods and Selectors/Labels
A label is a key/value pair that is attached to a Kubernetes resource. Labels can be attached to resources at creation time, as well as added and modified at any later time.
A label selector can be to organize Kubernetes resources that have labels. An equality-based selector defines a condition for selecting resources that have the specified label value. A set-based selector defines a condition for selecting resources that have a label value within the specified set of values.
Services
A service uses a selector to define a logical group of pods and defines a policy to access such logical groups. Services are durable and provide some mechanism of pod discovery. There are several types of services in Kubernetes:
- A ClusterIP service exposes pods to connections from inside the cluster (this is the default).
- A NodePort service exposes pods to external traffic by forwarding traffic from a port on each node of the cluster to the container port.
- A LoadBalancer service also exposes pods to external traffic, as NodePort service does, and additionally supplies load balancer functionality.
apiVersion: v1
kind: Pod
metadata:
  name: redis
  labels:
    color: purple
spec:
  containers:
  - name: redis
    image: redis
    ports:
    - containerPort: 6379
      name: redis-server
apiVersion: v1
kind: Service
metadata:
  name: redis-svc
  labels:
    name: redis-svc
spec:
  ports:
    - port: 2222
      targetPort: redis-server
  selector:
    color: purple
Pod Accessibility, Debugging
The aforementioned example defined a pod with a redis container and a corresponding ClusterIP-based service. The network infrastructure of our cluster is such that there are no network pathways to the cluster except for the API Server, thus, how do we interact with our container and service?
- Run a busybox container in “interactive” mode allowing you to access cluster services
within your namespace:
kubectl run -i --tty busybox --image=busybox --restart=Never --rm=true -- sh - Execute a port-forward from your machine to a specific pod:
kubectl port-forward $pod_name $local_port:$remote_port
Controllers, Deployments, and Replicas
A controller manages a set of pods and ensures that the cluster is in the specified state. Unlike manually created pods, the pods maintained by a replication controller are automatically replaced if they fail, get deleted, or are terminated.
A deployment defines a desired state for logical group of pods and replica sets. It creates new resources or replaces the existing resources, if necessary. A deployment can be updated, rolled out, or rolled back.
apiVersion: extensions/v1beta1
kind: Deployment
metadata:
  name: redis-deployment
spec:
  replicas: 1
  template:
    metadata:
      labels:
        color: purple
    spec:
      containers:
      - name: redis
        image: redis
        ports:
        - containerPort: 6379
          name: redis-server
apiVersion: v1
kind: Service
metadata:
  name: redis-svc
  labels:
    name: redis-svc
spec:
  ports:
    - port: 2222
      targetPort: redis-server
  selector:
    color: purple
A replication controller is responsible for running the specified number of pod copies (replicas) across the cluster.
A replica set is the next-generation replication controller. A replication controller supports only equality-based selectors (== vs !=), while a replica set supports set-based selectors (environment in [production, qa]).
Persistence: Volumes and Claims
A container file system is ephemeral: if a container crashes, the changes to its file system are lost. A volume is defined at the pod level, and is used to preserve data across container crashes. A volume can be also used to share data between containers in a pod. A volume has the same lifecycle as the the pod that encloses it—when a pod is deleted, the volume is deleted as well.
A persistent volume has a lifecycle independent of any individual pod.
A persistent volume claim defines a specific amount of storage requested and specific access modes. Kubernetes finds a matching persistent volume and binds it with the persistent volume claim.
apiVersion: v1
kind: PersistentVolumeClaim
metadata:
  name: redis-pvc
spec:
  accessModes:
  - ReadWriteOnce
  resources:
    requests:
      storage: 128M
  storageClassName: gp2
apiVersion: extensions/v1beta1
kind: Deployment
metadata:
  name: redis-deploy
spec:
  replicas: 1
  template:
    metadata:
      labels:
        color: purple
    spec:
      containers:
      - name: master
        image: redis
        ports:
        - containerPort: 6379
        volumeMounts:
        - name: redis-data-vol
          mountPath: /data
      volumes:
      - name: redis-data-vol
        persistentVolumeClaim:
          claimName: redis-pvc
apiVersion: v1
kind: Service
metadata:
  name: redis-svc
  labels:
    name: redis-svc
spec:
  ports:
    - port: 2222
      targetPort: 6379
  selector:
    color: purple
Attachment to PVCs must adhere to the PVC access modes:
- ReadWriteOnce – one bound Pod with R/W access
- ReadOnlyMany – many bound Pods with R only access
- ReadWriteMany – many bound Pods with R/W access
Cloud providers implement access modes based on their underlying resource specifications which are not consistent across providers. For example, AWS only implements ReadWriteOnce meaning PVCs must only be bound one-to-one with Pods.
See the persistent volume provider access modes table here for more info.
StatefulSets
Similar to Deployments, StatefulSets manage Pods that are based on an identical container spec. However, although their specs are the same, the Pods in a StatefulSet are not interchangeable. Each Pod has a persistent identifier that it maintains across any rescheduling enabling stable network ids and storage (PVCs).
StatefulSets also operate according to the Controller pattern. You define your desired state in a StatefulSet object, and the StatefulSet controller makes any necessary updates to the get there from the current state.
apiVersion: v1
kind: Service
metadata:
  name: redis-svc
  labels:
    app: redis
spec:
  ports:
  - port: 2222
    targetPort: 6379
  clusterIP: None
  selector:
    color: purple
apiVersion: apps/v1beta1
kind: StatefulSet
metadata:
  name: redis
spec:
  serviceName: "redis"
  replicas: 2
  selector:
    matchLabels:
      color: purple
  template:
    metadata:
      labels:
        color: purple
    spec:
      containers:
      - name: redis
        image: redis
        ports:
        - containerPort: 6379
        volumeMounts:
        - name: redis-pvc
          mountPath: /data
  volumeClaimTemplates:
  - metadata:
      name: redis-pvc
    spec:
      accessModes: [ "ReadWriteOnce" ]
      resources:
        requests:
          storage: 1Gi
Config Maps and Secrets
A Kubernetes secret allows users to pass sensitive information to containers. A secret can then be referenced when declaring a container definition and read from with containers.
A Kubernetes config map allows users to externalize application configuration parameters from a container image and define application configuration details, such as key/value pairs, directory content, or file content. Config map values can be consumed by applications through:
- environment variables
- local disks (mount points)
- command line arguments
Config Maps: Environment Vars
apiVersion: v1
kind: ConfigMap
metadata:
  name: test-configmap
data:
  data-1: value-1
  data-2: value-2
apiVersion: v1
kind: Pod
metadata:
  name: config-env-test-pod
spec:
  containers:
    - name: test-container
      image: busybox
      command: [ "/bin/sh", "-c", "env" ]
      env:
        - name: KUBE_CONFIG_1
          valueFrom:
            configMapKeyRef:
              name: test-configmap
              key: data-1
        - name: KUBE_CONFIG_2
          valueFrom:
            configMapKeyRef:
              name: test-configmap
              key: data-2
  restartPolicy: Never
Config Maps: Mounted Volumes
apiVersion: v1
kind: ConfigMap
metadata:
  name: test-configmap
data:
  data-1: value-1
apiVersion: v1
kind: Pod
metadata:
  name: config-volume-test-pod
spec:
  containers:
    - name: test-container
      image: busybox
      command: [ "/bin/sh", "-c", "cat/etc/config/path/to/special-key" ]
      volumeMounts:
      - name: config-volume
        mountPath: /etc/config
  volumes:
    - name: config-volume
      configMap:
        name: test-configmap
        items:
        - key: data-1
          path: path/to/special-key
  restartPolicy: Never
Health Checking
Kubernetes allows for two types of health checking of Pods:
- Readiness probes allow the kubelet to assess if a service is ready to start accepting traffic. A Pod is considered ready when all of its Containers are ready.
- Liveness probes allow the kubelet to monitor and assess when to restart a Container.
There are three different Health Check evaluation criteria available for both the Readiness and Liveliness probes:
- HTTP Health Checks - The Kubelet will call a web hook. If it returns between 200 and 399, it is considered success, failure otherwise.
- Container Exec - The Kubelet will execute a command inside your container. If it exits with status 0 it will be considered a success.
- TCP Socket - The Kubelet will attempt to open a socket to your container. If it can establish a connection, the container is considered healthy, if it can’t it is considered a failure.
apiVersion: v1
kind: Pod
metadata:
  name: redis-tcp-probe
spec:
  containers:
  - name: redis
    image: redis
    livenessProbe:
      tcpSocket:
        port: 6379
      initialDelaySeconds: 30
      timeoutSeconds: 1
    ports:
    - containerPort: 6379
Init Containers
In addition to having multiple containers, Pods can also have zero to multiple InitContainers. These are useful for bootstrapping data stores, prepping dirs, waiting on custom services, or really anything that you want to happen before your regular containers start.
InitContainers run serially and must all exit cleanly for your regular containers begin execution.
apiVersion: v1
kind: Pod
metadata:
  name: redis
spec:
  containers:
  - name: redis
    image: redis
    volumeMounts:
    - name: redis-data-vol
      mountPath: /data
  initContainers:
  - image: busybox
    name: seed-rdb-data-file
    volumeMounts:
    - name: redis-data-vol
      mountPath: /data
    command: ["/bin/sh", "-c", "echo UkVESVMwMDA4+glyZWRpcy12ZXIFNC4wLjH6CnJlZGlzLWJpdHPAQPoFY3RpbWXCZzvlWfoIdXNlZC1tZW3CcHoPAPoMYW9mLXByZWFtYmxlwAD6B3JlcGwtaWQoN2E1YjQzNmZmNTFkODYwMGQxOGEyNzYwYmRmY2EwOWRmZDM0YTZlY/oLcmVwbC1vZmZzZXTAAP4A+wEAAA5mYXZvcml0ZS1jb2xvcgdibHVycGxl/ydubEDBnEVJ | base64 -d > /data/dump.rdb"]
  volumes:
  - name: redis-data-vol
    emptyDir: {}
Resource Limits
Pods can specify the amount of memory and CPU it requires to function. Specifying physical resource requirements allows the Kubernetes Scheduler to make better decisions about where it will place Pods.
Memory limits are measured in bytes and can be declared as bytes, as fixed point integers (eg: 128M), and power-of-two equivalents (eg: 123Mi).
CPU limits are measured as units, generally as a CPU core and can be fractional; 1, .5, etc… A Pod with a CPU limit of .5 is allowed 2x the power of one limited to .25.
See Kubernetes Resource Requests and Limits
apiVersion: v1
kind: Pod
metadata:
  name: redis
spec:
  containers:
  - name: redis
    image: redis
resources:
  limits:
    cpu: 100m
    memory: 128Mi
  requests:
    cpu: 100m
    memory: 128Mi
Resource Scheduling
Out of the box, the Kubernetes Scheduler works to ensure that:
- Pods are only placed on nodes with free physical resources
- Pods of the same StatefulSet or ReplicaSet are spread across different nodes
- resource utilization across Nodes remains as evenly balanced as possible
Kubernetes does allow customizations, however allowing for:
- node affinity/anti-affinity
- taints and tolerations
- pod affinity/anti-affinity
- custom schedulers
Pod Events
What happens when a Pod is created?
- Create pod instruction, manifest transmitted to and verified by the Kubernetes API Server
- The API Server writes data to etcd
- The Scheduler listens for changes (new pod) via the API Server and binds the pod to a node. The API server receives the bind operation result and writes the data to etcd.
- Kubelets listens for changes (bind pod) via the API Server and executes docker commands on the node. The kubelet transmits execution result and status information the API Server which writes data to etcd.
Additional Topics
- Jobs (cluster level)
- Cron jobs (namespaced)
- RBAC
- Ingress rules